
Mastering the Sticks: A DIY Guide to Xbox One Controller Repair
Why Microsoft Xbox One Controller Repair Matters
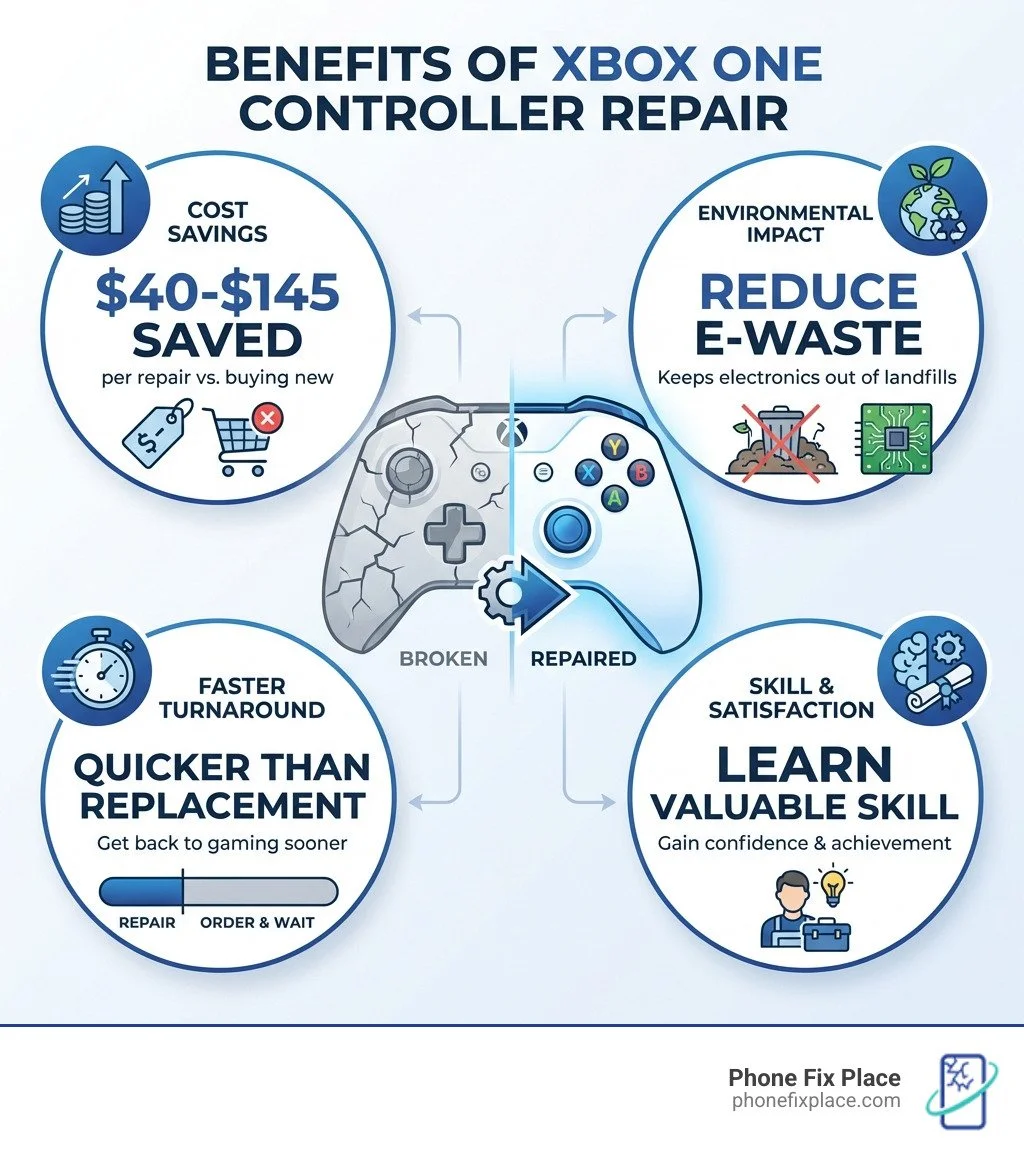
Microsoft Xbox One controller repair is a skill that can save you money, reduce electronic waste, and get you back to gaming faster than buying a replacement. Whether you're dealing with stick drift, unresponsive buttons, or sticky bumpers, most controller issues can be fixed at home with basic tools and replacement parts.
Quick Answer: Can You Fix Your Xbox One Controller?
Yes, most Xbox One controller issues are repairable. Here's what you need to know:
Common problems: Stick drift, broken bumpers, unresponsive buttons, connectivity issues
Required tools: TR8 Security Torx screwdriver, T6 Torx screwdriver, plastic spudger
Part costs: $20-$35 for most components (joysticks, buttons, bumpers)
DIY difficulty: Moderate—requires patience and careful disassembly
Professional option: Same-day repairs available at authorized service centers
Why Repair Instead of Replace?
Repairing your controller makes financial and environmental sense. A new Xbox One controller costs $60-$180 (depending on the model), while replacement parts typically run $20-$35. You'll also keep perfectly good electronics out of landfills—an increasingly important consideration as electronic waste continues to grow.
Many gamers hesitate to open their controllers, worried about making things worse. But with the right guidance and a bit of patience, Microsoft Xbox One controller repair is well within reach for most people. The process involves standard disassembly techniques, readily available parts, and tools that cost less than $15.
As Cyndi Anastasio, owner of The Phone Fix Place with nearly 14 years of engineering experience at Intel, I've performed countless microsoft xbox one controller repair jobs and helped customers decide between DIY fixes and professional service. My background in micro-soldering and circuit board diagnostics has shown me that controller repair is one of the most approachable electronics fixes for beginners—if you know what to watch out for.
Is Your Controller Broken? Identifying Common Xbox One Issues
Before diving into a microsoft xbox one controller repair, the first step is to accurately diagnose the problem. Sometimes, what seems like a major issue might be a simple software glitch or a dirty component. We often see these common issues with Xbox One controllers:
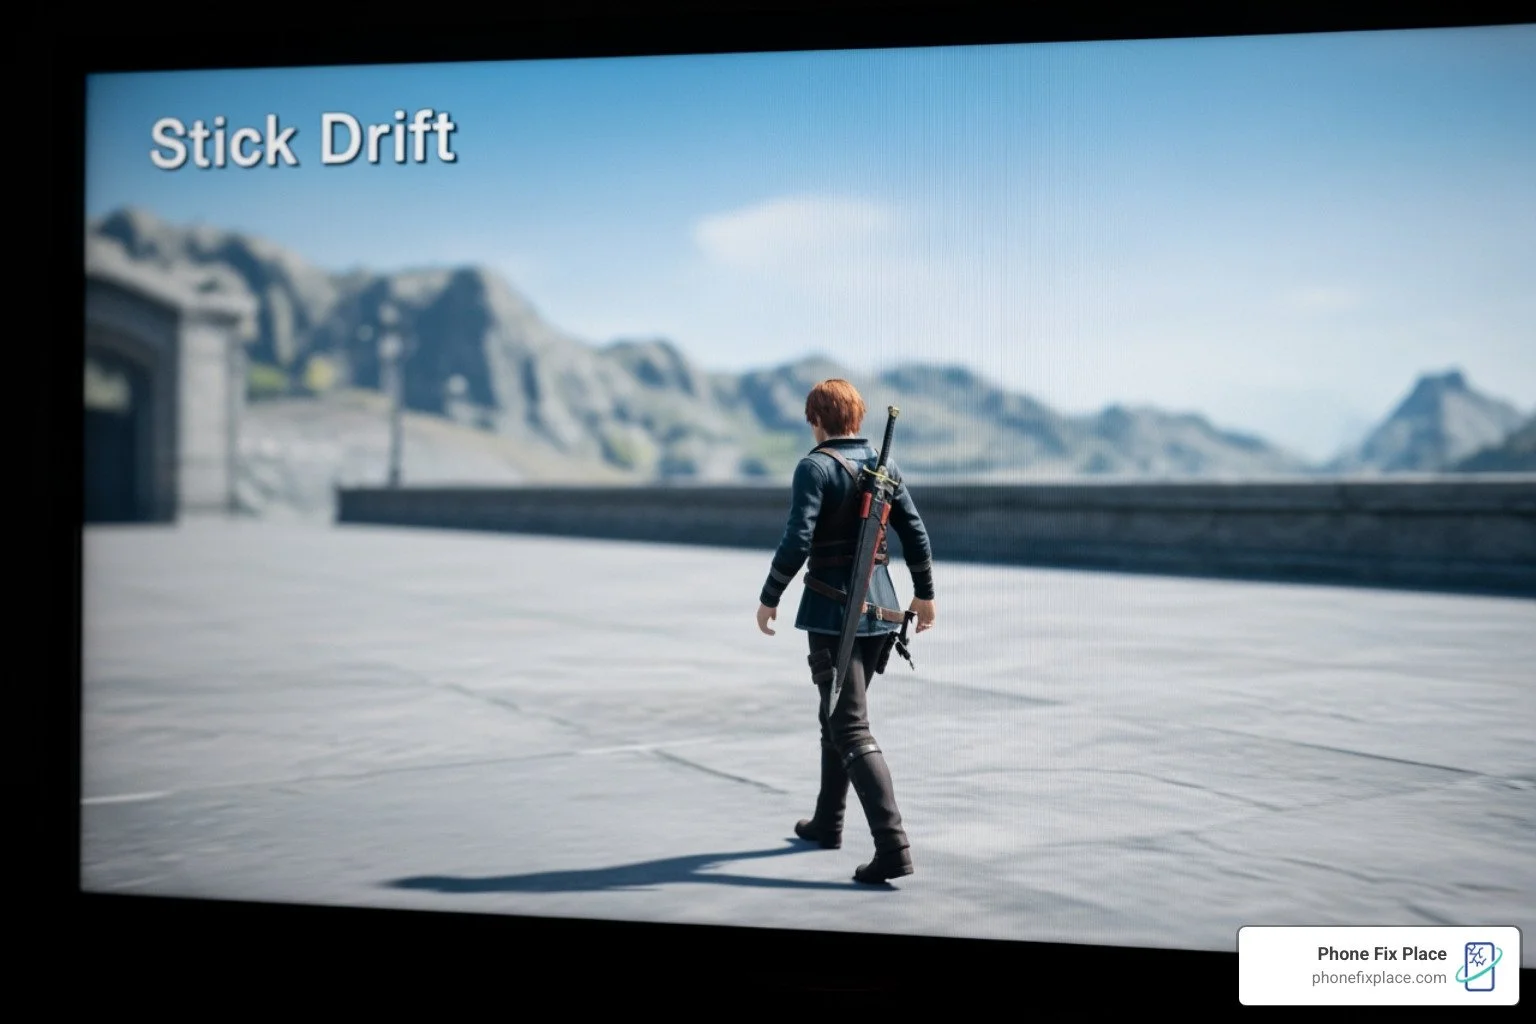
Stick Drift: This is perhaps the most common and frustrating issue. It occurs when your character or camera moves on its own, even when you're not touching the analog sticks. This is usually due to wear and tear on the joystick module's internal components.
Unresponsive Buttons: If your A, B, X, Y buttons, D-pad, or Menu/View buttons aren't registering presses, it could be due to dirty contacts, worn-out rubber membranes, or a faulty circuit board.
Sticky Bumpers (LB/RB): The shoulder bumpers are prone to becoming sticky, unresponsive, or even breaking off entirely. This often happens from repeated, forceful presses or physical impact. The bumper assembly is one of the most often replaced parts, alongside the joystick and motherboard.
Trigger Problems (LT/RT): Triggers might lose their responsiveness, get stuck, or simply stop working. This can impact games that rely on precise trigger input.
Power Issues: If your controller won't turn on, randomly disconnects, or struggles to hold a charge, it could indicate a problem with the battery contacts, charging port, or internal power circuitry.
Connectivity Drops: While sometimes a console or software issue, frequent disconnections can also point to a fault within the controller's wireless components.
Identifying the specific model of your Xbox One controller can also be helpful, as there are slight variations.
Original Xbox One Controller (2013): Recognized by its bulkier design and lack of a 3.5mm headphone jack (unless it's a later revision).
Xbox One S Controller (2016): Features a textured grip, Bluetooth connectivity for PC, and a built-in 3.5mm headphone jack. It has a slightly refined design.
Xbox Elite Wireless Controller Series 1 & 2: These premium controllers boast interchangeable components, paddle buttons, and a more robust build. They have different internal structures and replacement parts, with the Elite Series 2, for example, having a dedicated replacement battery and higher costs for parts like the Input PCBA and Motor Assembly.
While the general repair principles are similar, some parts are specific to each model. For instance, replacement parts for the standard Xbox Wireless Controller have different pricing than those for the Xbox Elite Wireless Controller Series 2.
Gearing Up: Tools and Parts for Your Repair
Alright, aspiring tech wizard, it's time to gather your gear! A successful microsoft xbox one controller repair starts with having the right tools. You wouldn't use a butter knife to fix a car, would you? The same principle applies here.
Here's a list of the essential tools you'll need:
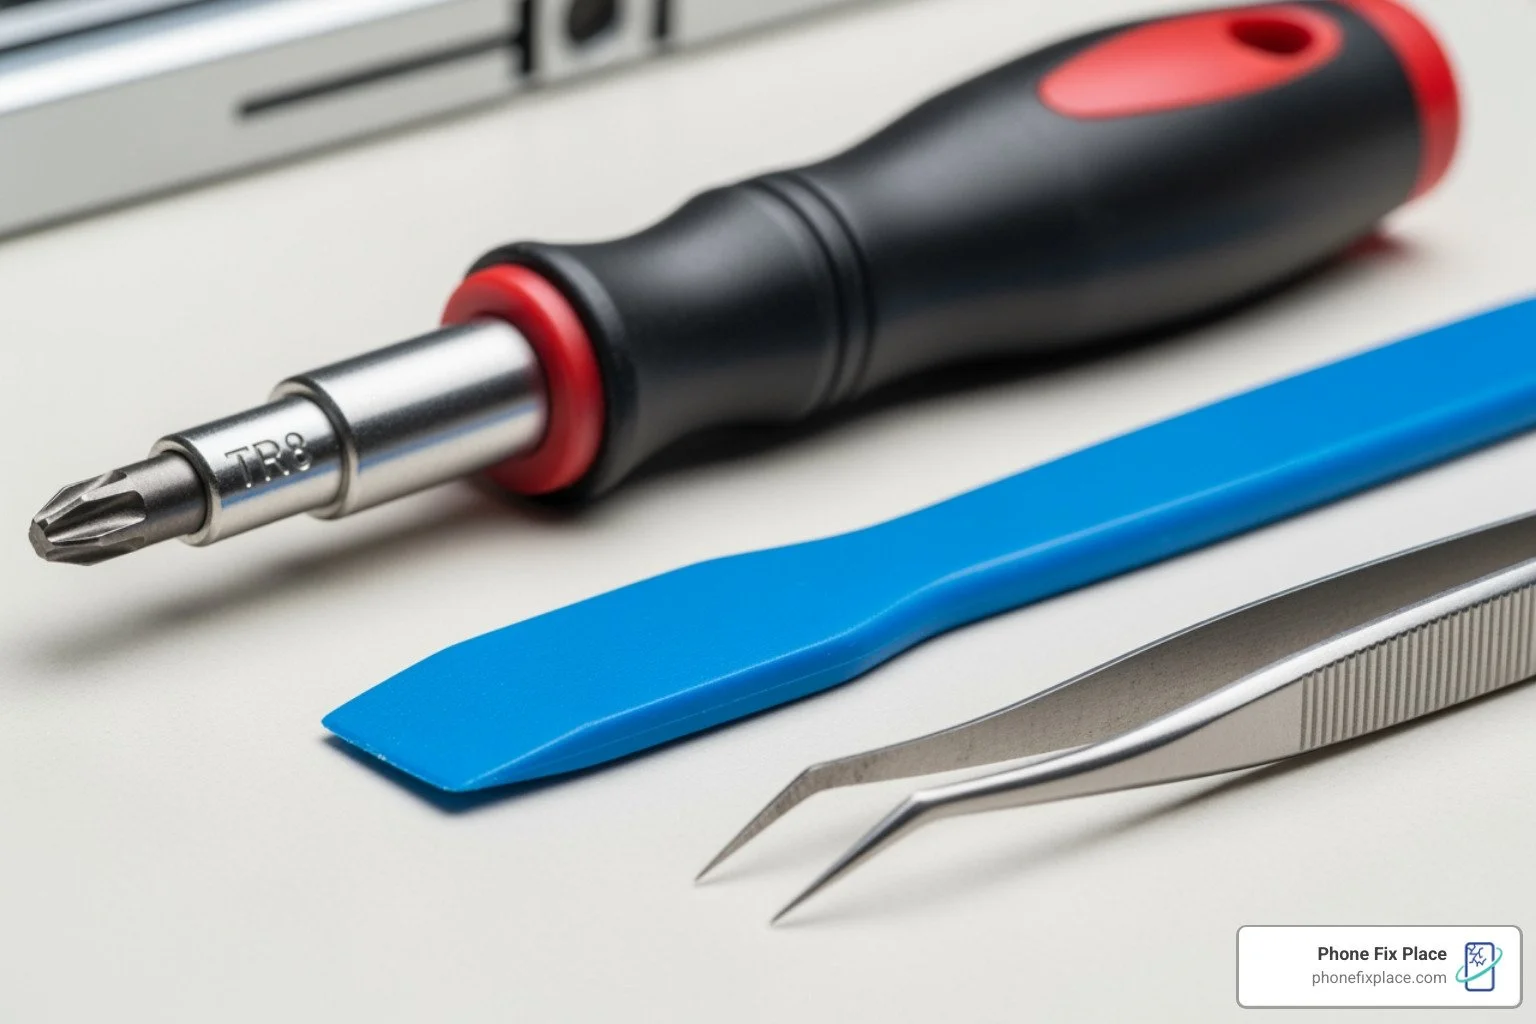
TR8 Security Torx Screwdriver: This is non-negotiable. Xbox One controllers use tamper-resistant Torx screws, which have a small post in the center of the screw head. A standard Torx bit won't fit. Look for a "Torx Security" or "TR8" bit with a hole in the center.
T6 Torx Screwdriver: You'll encounter smaller T6 Torx screws inside the controller, especially when dealing with the motherboards and internal components.
Plastic Spudger: This is your best friend for prying open plastic casings without damaging them. A nylon spudger is highly recommended over metal tools to prevent scratches or cracks on the controller's shell and internal components.
Tweezers (Optional but Recommended): Very useful for handling small screws, ribbon cables, and delicate components.
Small Phillips Head Screwdriver (Optional): While less common, some third-party accessories or internal component variations might use tiny Phillips screws.
Soldering Iron and Solder (for advanced repairs): If you're replacing joystick modules or dealing with detached rumble motor wires, a soldering iron will be necessary. This is for more advanced repairs and requires caution.
Sourcing Replacement Parts:
Once you know what's broken, you'll need the right replacement parts. We always recommend sourcing high-quality parts to ensure your repair lasts. Microsoft itself offers official replacement parts for out-of-warranty Xbox Wireless Controllers, including:
Replacement Top Case for Xbox Wireless Controller: $19.99
Replacement Buttons for Xbox Wireless Controller: $21.99
Replacement Input PCBA for Xbox Wireless Controller: $33.99
Replacement PCBA and Motor Assembly for Xbox Wireless Controller: $34.99
For the more premium Xbox Elite Wireless Controller Series 2, parts are also available:
Replacement Input PCBA for Xbox Elite Wireless Controller Series 2: $49.99
Replacement Top Case for Xbox Elite Wireless Controller Series 2: $25.99
Replacement Buttons for Xbox Elite Wireless Controller Series 2: $23.99
Replacement PCBA and Motor Assembly for Xbox Elite Wireless Controller Series 2: $59.99
Replacement Battery for Xbox Elite Wireless Controller Series 2: $34.99
Choosing genuine or high-quality third-party parts is crucial for reliable repairs. Cheap, poorly manufactured parts can lead to recurring issues or even damage other components. When sourcing, ensure compatibility with your specific Xbox One controller model.
The Main Event: A Step-by-Step Guide to Microsoft Xbox One Controller Repair
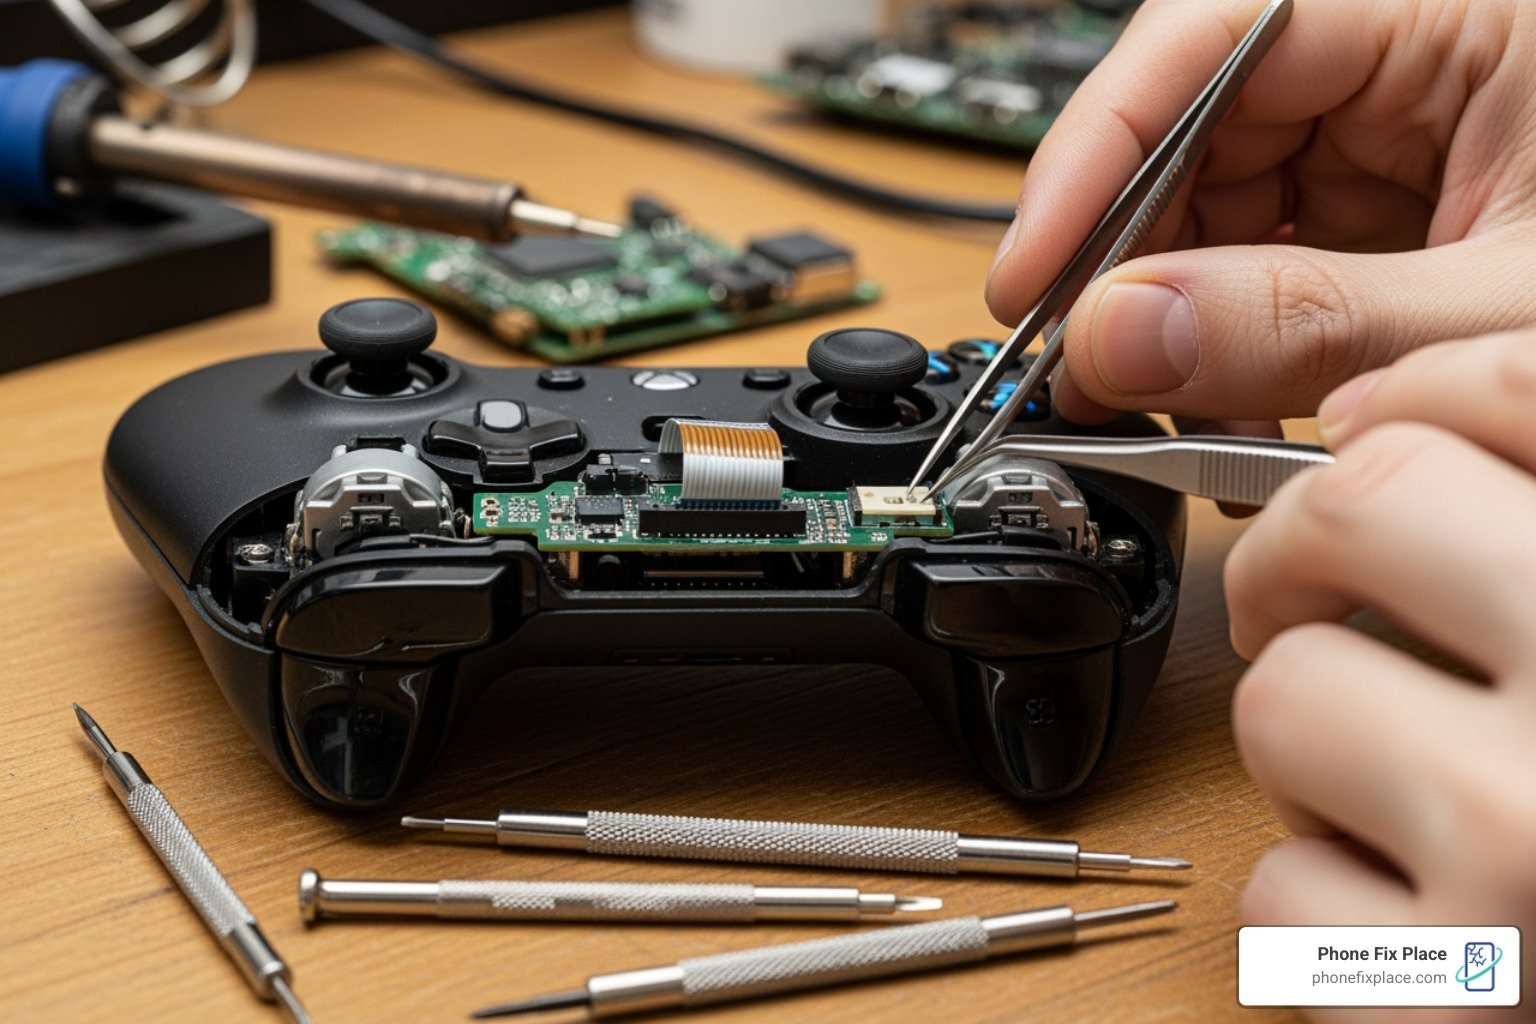
Now for the moment of truth! Performing a microsoft xbox one controller repair requires patience and a methodical approach. We'll walk you through the general disassembly steps, which are necessary for almost any internal repair, followed by specific component fixes.
General Disassembly (The Foundation for Any Repair):
Remove the Battery Pack: Always start by removing the battery pack cover and the batteries (or unplugging the USB cable if it's a wired controller). Safety first!
Pry Off Side Handles: Grip the controller firmly. Use your plastic spudger to carefully pry the side handles away from the front plate. Start at the bottom and work your way up the seam. This might require a little force, but be gentle to avoid breaking plastic clips.
Locate the Hidden Screw: Ah, the infamous hidden screw! On the back of the controller, usually under the barcode label, there's a single hidden screw. You'll need to either carefully lift the label or punch a small hole directly in its center to access it. This is where your TR8 Security Torx screwdriver comes in.
Remove Backplate Screws: Once the hidden screw is out, you'll find five more 10mm TR8 Security Torx screws on the back of the controller. Unscrew these carefully.
Remove the Backplate: With all screws removed, gently lift the backplate away from the controller. It should come off with minimal resistance.
Remove the Faceplate: Now, you can usually lift the front faceplate off the main body of the controller. Be mindful of any internal wires or ribbon cables that might still be connected.
Common Pitfalls During Disassembly:
Breaking Plastic Clips: Be gentle when prying the side handles. Excessive force can snap the plastic tabs, making reassembly difficult.
Stripping Screws: Always use the correct screwdriver bit (TR8 Security Torx and T6 Torx) to avoid stripping the screw heads.
Damaging Ribbon Cables: Be aware of thin ribbon cables connecting different circuit boards. Pulling too hard can tear them, leading to more extensive repairs.
Warranty Implications: Performing a DIY microsoft xbox one controller repair will almost certainly void any existing warranty with Microsoft. However, many controllers needing repair are already out of their warranty period.
Replacing Buttons and Bumpers
Worn-out buttons or sticky bumpers can severely impact gameplay. Fortunately, this is one of the more straightforward repairs.
Follow General Disassembly: Complete steps 1-6 above to remove the backplate and faceplate.
Access the Motherboard: Once the faceplate is off, you'll see the main circuit boards (motherboards) and the buttons. For button replacement, you might need to lift the top motherboard slightly or even remove it entirely to get to the rubber contact pads underneath.
Remove Old Buttons/Bumpers:
Buttons: The A, B, X, Y buttons, and D-pad typically sit in plastic housings with rubber contact pads beneath them. Gently pry out the old buttons and remove the rubber pads.
Bumpers: The LB/RB bumper assembly is usually held in place by small plastic pegs or screws. Carefully pry or unscrew the old bumper assembly. Some designs may require desoldering if the bumper switch is directly soldered to the board
Install New Parts: Place the new rubber contact pads (if replacing) and then the new buttons into their respective housings. For bumpers, snap or screw the new assembly into place.
Reassemble: Follow the general disassembly steps in reverse order, ensuring all components are seated correctly and screws are tightened appropriately.
Fixing Analog Stick Drift
Analog stick drift is a menace for gamers. The most effective fix often involves replacing the entire joystick module. This is a more advanced microsoft xbox one controller repair as it typically requires soldering.
Complete General Disassembly: Follow steps 1-6 from the general disassembly section.
Access the Joysticks: The joystick modules are soldered directly onto the main motherboard. You'll need to locate them.
De-solder the Old Module: Using a soldering iron and de-soldering braid/pump, carefully remove the solder from all pins connecting the joystick module to the motherboard. This requires a steady hand and knowledge of soldering. Take your time to avoid damaging the traces on the circuit board.
Remove the Old Module: Once de-soldered, the old joystick module should lift off the board.
Install the New Module: Align the new joystick module with the holes on the motherboard. Ensure all pins pass through correctly.
Solder the New Module: Carefully solder each pin of the new joystick module to the motherboard. Ensure strong, clean solder joints.
Reassemble: Once the new joystick is securely soldered, follow the general disassembly steps in reverse.
After replacing a joystick, some controllers might benefit from recalibration, though this is often handled automatically by the console software. If drift persists, it might indicate an issue with the new part or the soldering.
Advanced microsoft xbox one controller repair: Motherboard Issues
Motherboard issues are less common but can manifest as complete controller failure, specific button/joystick malfunctions, or charging problems. Replacing the Input PCBA (Printed Circuit Board Assembly) or the PCBA and Motor Assembly is a more complex microsoft xbox one controller repair.
Complete General Disassembly: Perform steps 1-6 as outlined earlier.
Disconnect Rumble Motors: The vibration rumble motors are often connected to the top motherboard with wires that may need to be de-soldered to fully remove the motherboard. There are also trigger rumble motors located under the triggers that may need attention.
Remove Top Motherboard: There might be small T6 screws holding the top motherboard in place, typically near the rumble motor sockets. Unscrew these and carefully lift the top motherboard. Be gentle, as it might be connected by ribbon cables to the bottom board.
Remove Trigger Assemblies: For some motherboard replacements, you'll need to unscrew T6 Hex screws located under the triggers and remove the trigger covers.
Remove Bottom Motherboard: The bottom motherboard is usually secured by several T6 Torx screws. Unscrew these. You may also need to carefully pry off the bumper assembly and the piece surrounding the Home button, as they might be holding the motherboard in place.
Replace and Reassemble: Carefully place the new Input PCBA or PCBA and Motor Assembly into the controller. Reconnect all cables and solder any necessary connections (like rumble motor wires). Then, follow the general disassembly steps in reverse, ensuring everything is securely fastened.
It's worth noting that motherboard designs can differ slightly between Xbox One controller revisions (e.g., those with a 3.5mm headphone jack versus older models). Ensure your replacement PCBA is compatible with your specific controller model.
DIY vs. Professional Help: When to Call in the Experts
Deciding between a DIY microsoft xbox one controller repair and professional service often comes down to a few key factors: cost, time, difficulty, and your comfort level with electronics. While we encourage the satisfaction of a successful DIY fix, sometimes it's best to leave it to the pros.
Cost Analysis:
DIY Parts Cost: As we've seen, individual replacement parts like a top case ($19.99), buttons ($21.99), or a PCBA ($33.99-$59.99 depending on the model) are relatively inexpensive. If you already own the tools, your cost is just the part.
Professional Repair Estimates: Professional services in Albuquerque, New Mexico, like ours at Phone Fix Place, offer competitive pricing. While specific costs vary by issue, we provide free diagnostics to give you an accurate estimate upfront. Many professional repair services also offer price matching guarantees.
Risks of DIY:
Breaking Plastic Clips: The delicate plastic clips and tabs holding the controller shell together can easily snap if too much force is applied.
Damaging Ribbon Cables: Internal ribbon cables are fragile. Tearing one can turn a simple repair into a much more complex (and expensive) one.
Stripping Screws: Using the wrong screwdriver bit or applying too much torque can strip screw heads, making disassembly nearly impossible without drilling.
Water Damage: If your controller has suffered liquid damage, a DIY repair is significantly more challenging. Corrosion can spread rapidly, and pinpointing damaged components requires specialized knowledge and tools.
When to seek a professional for your microsoft xbox one controller repair
We understand that opening up your beloved gaming gear can be daunting. Here are some scenarios where calling in the experts at Phone Fix Place might be your best bet:
Time Constraints: If you need your controller back in action quickly for an upcoming gaming session, a professional service can often provide same-day repairs for common issues.
Lack of Tools or Expertise: If you don't have the specialized Torx screwdrivers, a soldering iron, or feel unsure about the intricate steps, it's safer to let experienced technicians handle it.
Failed DIY Attempt: Don't despair if your DIY fix didn't work out. We often see controllers that have been partially disassembled or had issues compounded by an attempted repair. We can still assess and fix them.
Ensuring a Quality Fix: Professional repair shops, like Phone Fix Place, offer warranties on their repairs—we provide a one-year warranty on all our services. This gives you peace of mind that your controller will function correctly.
Complex Repairs: For issues like water damage, widespread circuit board problems, or if you're just unsure what the problem is, our free diagnostics can identify the root cause and provide a solution.
At Phone Fix Place in Albuquerque, New Mexico, we specialize in game console repairs, including microsoft xbox one controller repair. Our skilled technicians have over 40 years of combined experience and use top-notch parts and tools to ensure your controller is returned to you in perfect working order. We aim for quick turnarounds, so you can get back to your games without a long wait.
More info about game console repair services
Frequently Asked Questions about Xbox Controller Repair
We get a lot of questions about Xbox controller repairs. Here are some of the most common ones we hear:
What's the difference between an Xbox One and an Xbox Series X|S controller?
While they look similar at first glance, there are several key differences:
Physical Design: The Xbox Series X|S controller is slightly smaller and has a more refined shape for improved ergonomics.
D-pad: The Series X|S controller features a dished D-pad, offering more precise diagonal inputs compared to the Xbox One's cross-shaped D-pad.
Share Button: The Series X|S controller introduced a dedicated "Share" button in the center, allowing for quick capture of screenshots and video clips. Xbox One controllers use the "Menu" and "View" buttons for similar functions, but without a dedicated share button.
USB-C vs. Micro-USB: The Series X|S controller uses a USB-C port for charging and wired connection, while Xbox One controllers (and some earlier Xbox Wireless Controllers) use micro-USB.
Internal Components: While both are wireless, the internal architecture, including Bluetooth modules and vibration motors, can vary, impacting part compatibility and repair procedures.
In terms of repairability, the underlying principles of disassembly (Torx screws, prying) remain similar, but the specific part designs and locations can differ.
Will repairing my controller myself void the warranty?
Yes, performing a DIY microsoft xbox one controller repair will almost certainly void your controller's warranty with Microsoft. Manufacturers typically have clauses that void warranties if the device has been opened or tampered with by unauthorized personnel.
However, most controllers that require repair are often outside their original warranty period anyway. Microsoft does offer a self-service parts program, selling official replacement components for out-of-warranty accessories. This suggests a growing recognition of the "right to repair" movement, but it doesn't change the warranty implications for self-repair during the active warranty period.
If your controller is still under warranty and experiencing issues, your first step should be to contact Xbox Support to explore official repair or replacement options. You can Check your warranty status on Microsoft's support site.
How much does a typical controller repair cost?
The cost of an Xbox One controller repair depends heavily on whether you do it yourself or opt for professional service, and what parts are needed.
DIY Part Costs:
Replacement Top Case: ~$20-$26 (for standard or Elite controller)
Replacement Buttons: ~$22-$24 (for standard or Elite controller)
Replacement Input PCBA (motherboard): ~$34-$50 (for standard or Elite controller)
Replacement PCBA and Motor Assembly: ~$35-$60 (for standard or Elite controller)
A new joystick module (for stick drift) typically costs less than $10, but requires soldering tools.
The total DIY cost is the price of the part plus any tools you might need to buy (e.g., a TR8 Security Torx screwdriver set can be $10-$15).
Professional Service Cost: At Phone Fix Place in Albuquerque, we offer free diagnostics for all game console and controller repairs. This means we'll assess your controller's issue and provide you with a transparent cost estimate before any work begins. While we can't give an exact figure without a diagnosis, our goal is to provide affordable tech repairs that are a better value than buying a brand-new controller. Many professional services aim to be cost-effective and often include a warranty on the repair, which DIY doesn't.
Conclusion
Mastering microsoft xbox one controller repair empowers you to take control of your gaming experience, save money, and contribute to a more sustainable future by extending the life of your devices. From diagnosing common issues like stick drift and unresponsive buttons to skillfully replacing components, the journey of DIY repair is both challenging and rewarding.
We've walked through the essential tools, common pitfalls, and step-by-step guides for various repairs. Whether it's a simple button replacement or a more advanced motherboard issue, patience and precision are your best allies.
However, we understand that not everyone has the time, tools, or comfort level for intricate electronics repair. If you find yourself needing expert assistance with your microsoft xbox one controller repair, or any other gaming console issue, our team at Phone Fix Place in Albuquerque, New Mexico, is here to help. We offer fast, reliable, and affordable repairs with free diagnostics and a one-year warranty on all our services. Don't let a faulty controller keep you from your favorite games.